Batik: A first experience of an ancient discipline
I was really excited at the prospect of attending the Batik workshops. Batik was a discipline, I had no previous experience whatsoever in. I was always intrigued with the type of Art, batik creates. However, I did not feel like I had the confidence to tackle it by myself, Therefore, I was delighted with the chance of being taught Batik by an Artist.
Having now experienced the Batik process, I noticed many similarities between it and the process of printmaking in general. In both disciplines, an image cannot be totally copied from its original source, it has to be converted or altered to make it suitable for the process. Often, the image has to simplified, in respects to the level of detail or amount of colours in an image. Only then is it suitable to apply the process, either Batik in this case, or in my own previous experiences printmaking. If the image is not converted correctly, the resulting Print or Batik, will not be as successful as desired. Planning is essential!
Step 1: Researching a Suitable theme/Image
I decided to focus on the landscape, and its ever changing seasons. How nothing stays the same on the landscape, it is ephemeral, changing all the time. I believed that this would be a suitable theme for my very first Batik! Eventually, I decided to focus on Springtime, especially on the flowers and trees with new buds and foliage.


Step 2: Deciding on my final image
The Batik process is quite different to anything I had previously experienced. I decided to make a simple design for my first attempt at Batik. As I feared anything too complicated would inhibit my learning on the discipline so early on. Therefore, I decided on this image as my final image. Although, I redrew the image, or converted it. Making the image details simpler, and suitable for the Batik Process.
Step 3: Experimenting with Waxes and Dyes
There are 2 types of wax used in batik. Paraffin wax used for the crackling effect it gives. It is a much more brittle wax, which allows the dye gain more random and texture effect on the fabric. Beeswax is also used. However, it is a much harder wax, used for blocking out larger areas, it will not crack, peel or break off, therefore it is useful to use for large areas of flat colour, it will preserve the selected colours during the dying process. 100% Cotton or 100% Linen are the best materials to use for Batik, as they are completely natural fabrics, which dyes excellently. Fabrics containing man made elements such as polyester do not take the dye as well, because of the amount of plastic contained in the fibres.
 An Example of Paraffin Wax
 An Example of Beeswax
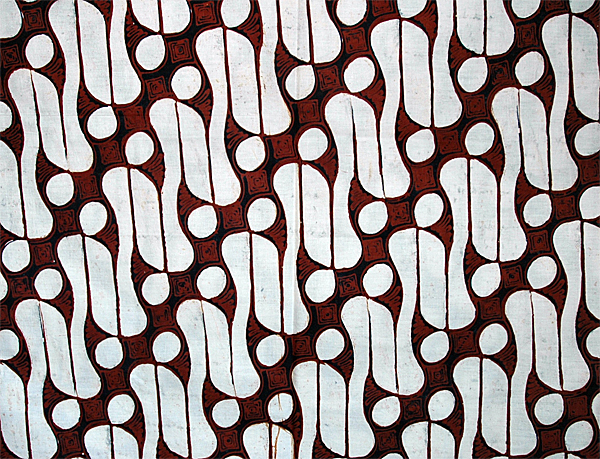
Beeswax used in batik
The large white areas were created using Beeswax

Paraffin Wax used in batik
The crackling effect seen is create by the use of Paraffin wax

On this piece of linen, I tried some spot dying, where I applied the dye to the linen using a paintbrush. This techniques is suitable for areas of detail, as it allows a lot of control of where the colour goes.

On this piece of cotton, I experimented with both beeswax and paraffin wax to see for myself, how they reacted side by side.
Step 4: The Wax Process


Batik requires the Artist, to draw onto the material using Wax. Wax needs to be in a liquid form for this to be possible, therefore, it is melted in a wax pot, as pictured above. A canting is dipped in the liquid wax, it has a reservoir near the nib that allows for the wax to slowly flow onto the nib, allowing the artist to draw with the wax! A sponge, stamps, paintbrush and many other tools can be used to gain various types of marks and textures with the wax. The wax must soak right through the material, or else it will not do its job of protecting the fabric from the ink. The material must be held tightly on a wooden frame, holding it tight with pins, this creates a suitable tension to allow the wax to soak through.
 A batik frame
Step 5: The Dye Process
Dyes need to be mixed correctly, according to manufacturers guidelines, in a clean environment. The relevant health and safety concerns must be followed especially when mixing dyes. To achieve a light colour, fabric must be placed in the dye bath for a short time (5 mins) , and to achieve a dark colour (15 mins). This is the dip dye process. Therefore, the dye process requires careful timings. You must start with your lightest colour first, and dye this first and the cover it with wax, and dye again. The lightest colours can only be achieved at the start, as the repeated dying would darken the naked fabric, therefore darkest colours are created last.


Step 6: The drying process
Leave the finished batik to dry naturally inside, hanging on a clothesline is best, as it allows the excess dye to drip off evenly, and not pool on certain areas of your image.
Step 7: Waxing off process
To reveal your final image. The wax must be taken off the image. The wax has to be ironed off, as it is now solid, the heat from the iron will melt it off. Lots of layers of paper have to be used to soak all the wax off the fabric. Once all the excess ink is melted off the final image can be revealed.

No comments:
Post a Comment