Thursday, 28 December 2017
Monday, 18 December 2017
PME 2 - A little more experience, a little more wiser
My Teaching Statement
The
Foundations of education are vitally important aspects of the professional
development
of a
teacher. Studying curriculum and assessment, history, sociology, psychology,
and
philosophy
form a corner stone of teacher education. They inform the teacher on how they
can resolve
questions both given by staff and students, to understand their particular
school’s
role in the local community and wider society, promoting all forms of literacy
both
academic and
social, make all lessons inclusive for students of all abilities, instead of
having
a narrow
educational focus. People have many reasons for becoming teachers, many
reasons are
admirable such as developing student literacy, or love for a specific subject,
however,
there can be a view in wider society that many people pick teaching, for the
shorter
hours, and holidays. This is far from the truth from what I have witnessed in
my own
teaching
practise. Many teachers work incredibly hard to make lessons as exciting,
educational
and inclusive as possible, they also focus on the wider school atmosphere
outside
their classroom door, working on student well-being and communication in a non-
academic,
instead holistic context. This is why a good understanding of the ethical and
professional
identity of the teacher is vitally important. A teacher who believes that that
are
both
professional and ethical in their teaching practise, should be able to observe
each
group, and
each individual within that group, to tailor make a lesson suitable for that
particular
class. Every class is vastly different to one another, as are the students
themselves.
Therefore, it is important for teachers to be able to craft lessons that are
not all
the same
cookie cutter experience, but instead create something that caters for each
students
individual need. This is by no means an easy task, but it is essential, for a
‘good’
teacher, one
that fosters a creative and welcoming learning environment for all their
pupils.
A teacher
who recognises that the efforts of all pupils within the class need to be
recognised
in order to
aid student development. Recognition is a fundamental trait needed. Teachers
need to
notice positive aspects in teenagers, and use it as the basis for the teacher
pupil
relationship.
Teachers must also recognise their students backgrounds, either family,
nationality,
ethnic minorities and religious beliefs. This cannot be ignored, as it is a
crucial
aspect of
each student, and should always be taken into consideration when teaching
lessons. I
believe that in order for myself, as teacher, to learn, I have to first
critically
understand
the professional, ethical and even moral role of myself as a teacher. In order,
to
become a
teacher who can understand how to encourage my classes to progress and learn
for
themselves. In PME 1 all of this was new to me, and it was something I had to study myself, in order for myself to become comfortable with to use. However, in PME 2, I feel I have more experience to draw upon now, and feel much more comfortable in applying the various teaching methodologies I have studied in college.
Wednesday, 3 May 2017
Well being
How Art aids student well being in the secondary school system

Art has for many years been perceived as a 'doss' subject. I, myself have witnessed this expression frequently, however, I have begun to notice that this attitude is changing, and that people are now understanding that Art has an important role to play in secondary schools. Art vastly aids, develops and helps students understand their own well being, and how they can develop it through Art.
Art can develop a students confidence, in ways no other subjects can offer! In the Art room, a variety of tasks, skills, techniques and opinions are welcomed. Difference and variety are welcomed with open arms, and are celebrated. Students feel more able to voice their opinions, as in Art class having an opinion, and expressing ones own opinions is developed. Students are asked to discuss topics of Art, as well critique their own work and classmates. This gives confidence to students, as they are allowed the time to develop these vital life skills, in the art room. For more information on this interesting topic, please follow this link The connection between Art and health
Art can tackle subjects or themes that are perceived as taboo or difficult. Subjects such as mental health, Sexual violence and bullying are all subjects that can be discussed and explored through Art. It can be a safe environment for a class to openly learn about and talk about such topics. Students can gain the right tools, and understand ways of emotionally dealing with such topics, through Art. Art can also be a source of healing for students, that is why it is so hugely important in the school curriculum. Here is an interesting article from the Huffington Post on this Art can be good for mental Health

Batik: A first experience of an ancient discipline
I was really excited at the prospect of attending the Batik workshops. Batik was a discipline, I had no previous experience whatsoever in. I was always intrigued with the type of Art, batik creates. However, I did not feel like I had the confidence to tackle it by myself, Therefore, I was delighted with the chance of being taught Batik by an Artist.
Having now experienced the Batik process, I noticed many similarities between it and the process of printmaking in general. In both disciplines, an image cannot be totally copied from its original source, it has to be converted or altered to make it suitable for the process. Often, the image has to simplified, in respects to the level of detail or amount of colours in an image. Only then is it suitable to apply the process, either Batik in this case, or in my own previous experiences printmaking. If the image is not converted correctly, the resulting Print or Batik, will not be as successful as desired. Planning is essential!
Step 1: Researching a Suitable theme/Image
I decided to focus on the landscape, and its ever changing seasons. How nothing stays the same on the landscape, it is ephemeral, changing all the time. I believed that this would be a suitable theme for my very first Batik! Eventually, I decided to focus on Springtime, especially on the flowers and trees with new buds and foliage.


Step 2: Deciding on my final image
The Batik process is quite different to anything I had previously experienced. I decided to make a simple design for my first attempt at Batik. As I feared anything too complicated would inhibit my learning on the discipline so early on. Therefore, I decided on this image as my final image. Although, I redrew the image, or converted it. Making the image details simpler, and suitable for the Batik Process.
Step 3: Experimenting with Waxes and Dyes
There are 2 types of wax used in batik. Paraffin wax used for the crackling effect it gives. It is a much more brittle wax, which allows the dye gain more random and texture effect on the fabric. Beeswax is also used. However, it is a much harder wax, used for blocking out larger areas, it will not crack, peel or break off, therefore it is useful to use for large areas of flat colour, it will preserve the selected colours during the dying process. 100% Cotton or 100% Linen are the best materials to use for Batik, as they are completely natural fabrics, which dyes excellently. Fabrics containing man made elements such as polyester do not take the dye as well, because of the amount of plastic contained in the fibres.
 An Example of Paraffin Wax
 An Example of Beeswax
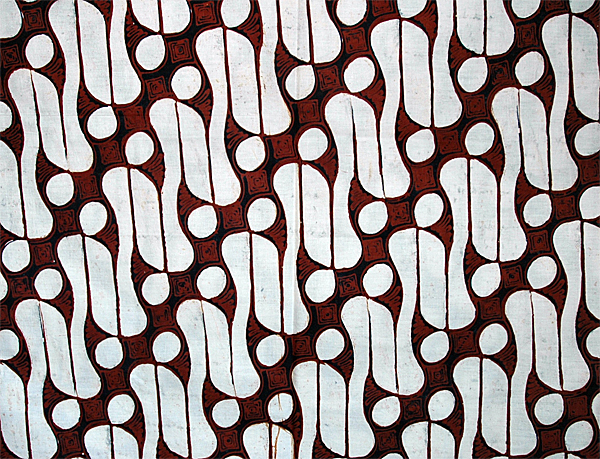
Beeswax used in batik
The large white areas were created using Beeswax

Paraffin Wax used in batik
The crackling effect seen is create by the use of Paraffin wax

On this piece of linen, I tried some spot dying, where I applied the dye to the linen using a paintbrush. This techniques is suitable for areas of detail, as it allows a lot of control of where the colour goes.

On this piece of cotton, I experimented with both beeswax and paraffin wax to see for myself, how they reacted side by side.
Step 4: The Wax Process


Batik requires the Artist, to draw onto the material using Wax. Wax needs to be in a liquid form for this to be possible, therefore, it is melted in a wax pot, as pictured above. A canting is dipped in the liquid wax, it has a reservoir near the nib that allows for the wax to slowly flow onto the nib, allowing the artist to draw with the wax! A sponge, stamps, paintbrush and many other tools can be used to gain various types of marks and textures with the wax. The wax must soak right through the material, or else it will not do its job of protecting the fabric from the ink. The material must be held tightly on a wooden frame, holding it tight with pins, this creates a suitable tension to allow the wax to soak through.
 A batik frame
Step 5: The Dye Process
Dyes need to be mixed correctly, according to manufacturers guidelines, in a clean environment. The relevant health and safety concerns must be followed especially when mixing dyes. To achieve a light colour, fabric must be placed in the dye bath for a short time (5 mins) , and to achieve a dark colour (15 mins). This is the dip dye process. Therefore, the dye process requires careful timings. You must start with your lightest colour first, and dye this first and the cover it with wax, and dye again. The lightest colours can only be achieved at the start, as the repeated dying would darken the naked fabric, therefore darkest colours are created last.


Step 6: The drying process
Leave the finished batik to dry naturally inside, hanging on a clothesline is best, as it allows the excess dye to drip off evenly, and not pool on certain areas of your image.
Step 7: Waxing off process
To reveal your final image. The wax must be taken off the image. The wax has to be ironed off, as it is now solid, the heat from the iron will melt it off. Lots of layers of paper have to be used to soak all the wax off the fabric. Once all the excess ink is melted off the final image can be revealed.

Monday, 16 January 2017
Observational Drawing and Painting
Observational Drawing and Painting

Observational Drawing
Drawing is a fundamental skill of Art. It is a core element of the discipline, and it is at the heart of every Artistic practice. Therefore, it is paramount it is taught effectively to pupils. It is at the core of the Junior and Leaving Certificate curriculums. It was the first workshop I participated in on this course. Even though I felt I already had a good education in my drawing practice. My knowledge was not sufficent enough for teaching to others. These drawings are examples of observational drawing workshops, where intense and close study of an object is required. Line, Proportion, Shading, tone, Foreshorting are all terms I understood, but a pupil would not necessairly. Therefore, it was probably one of the more important workshops to be taught to us.

Obsersevational Painting

The Fundamentals of colour mixing, composition and most importantly observation were shown to us in this workshop. We were shown how to set up a still life, and draw thumbnail sketches, to see which still life layout would be most successful.Once, that was completed a large scale drawing was begun. In this picture below you can see some of my original sketch and the first two layers of paint applied to this still life painting.


School Art Week
School Art Week
Many schools have a Science, Maths, French or Irish week, However, Art week is much rarer! Luckily, the school where I am on placement, is fortunate enough to have a school Art week, that involves all staff, pupils and the wider artistic community of the local area. Art week was set up to highlight, all the different career opportunities, that can lead from a career in the visual arts, for the pupils who often ask; What job opportunities can they get from studying Art?. People working in the local artistic sector are brought into the schools to show them their own unique avenue of the sector, and how they make a living from Art. Graphic designers, Ceramicists, Painters, Fashion Designers, Print makers, Photographers and Book maker, were all introduced to the Art pupils over the course of one week! Each Professional gave a demonstration of an aspect of their career, and made a mini project with the teachers assistance in class. They also gave a presentation about their career, and answered any possible questions, pupils may have had! It was a unique opportunity for the pupils, as normally many of them would never have had the opportunity to meet such individuals or perhaps ask a question.
A graphic designer visited one of my classes, and the class, myself, and the graphic designer, were given the task by the Principal to create some new Art suitable to hang in the canteen. The graphic designer presented a string project idea to the class. Over the course of our classes together that week, everyone collaborated together. It was wonderful to see the class interact with the graphic designer. I think it made Art seem like a much more serious alternative career wise!
Large MDF boards were used for the project. Pupils marked out each letter, and designated pupils were supervised hammering in the nails. Pupils voted for what colours they wanted to use, and the whole class under the direction of the graphic designer applied the string in whatever pattern they liked. The graphic designer used this project to demonstrate to the class, the variety of the career and how a degree in visual communications is applied in real life. Pupils got a taster of the career, as they were talked through each step and shown previous examples of work, Many of which some examples were already familiar to the class!
Participating in Art week, on my placement, is something I defiantly gained a lot of experience from, and it is something I would defiantly introduce to another school.


Relief Printmaking
Relief Printmaking
Most likely my favourite workshop I attended during semester 1 of the PME. This workshop solely focused on Relief printmaking; Lino printing to be exact. As I myself as a printmaker, who works solely using lino printing, I was intrigued to see how the format would be simplified and changed to correspond with a secondary school format. As a printmaker, I use various toxic chemicals and inks, in the process, before I completed this workshop, I was unsure how I could adapt this for the classroom.
Step 1
We were instructed to pick an image that was bold, and that contained good contrast, making it suitable for lino print. As this is a graphic medium, it sometimes can be more difficult to pick up subtle details. I choose an image of a landscape I had taken myself previously. I felt it had the key criteria required. It was a bold image, that had an equal amount of positive and negative space. This is my chosen image.

Step 2
A photocopy in black and white of the image, was next used to simply highlight areas of contrast. Wherever was black on the photocopy would print, and wherever was white would not print. The idea is very simple! We were encouraged to draw over the photocopies with white chalk or black markers, depending on what areas of the image we felt we needed to change. This was a good exercise as it simply showed the ability of lino print.
Step 3
Designs were next drawn directly onto the surface of the lino. Areas that were to be not carved, I coloured in completed using a black marker, areas to be carved, I left a blank. Planning is crucial with lino print, as once you start carving, you cannot afford to make a mistake as the whole block will be ruined. Therefore, this planning stage in the classroom really has to be closely observed and explained by the teacher in class.
Step 4
The different lino carving gouges were shown to us. This was really helpful, as many pupils tend not to vary their use of gouges, therefore a print can look boring. Lecturers gave us a demonstration about the carving process. They showed us the V and U gouges in the various sizes. Telling us V size was more useful for thin lines and detail, whereas U was more useful, for carving away large areas and for creating interesting textures on the block. The correct manner to hold a lino cutter was shown to us, and we were told to 'always carve away from ourselves'. Bench's were supplied, and it was stressed that safety in the classroom is paramount, especially when using lino print.
Step 5
The carving stage commenced. Lecturers did not interfere too much in our actual carving. But they were especially watchful of safety. Constantly reminding us, about the danger of the sharpness of the lino cutters. I really took this into consideration, as in a classroom environment, an accident could escalate quite quickly. They kept emphasising the dangers, and to always be mindful of a pupil injuring themselves with the lino cutter. A bench hook must always be used when carving, to eliminate as much risk as possible.
Step 6
Next stage in the lino process, is the printing stage. As most schools, are not fortunate enough to have a printmaking workshop, an alternative means must be used. Also, toxic chemicals associated with printmaking cannot be used, therefore everything used is water based and non-toxic. We were given a demonstration in classroom printing, which to me, was especially interesting, as I was unsure how to approach this aspect of the applying the discipline. They explained to us that planning is everything when it comes to this. To be prepared and have the room, clearly set up in designated zones, for example; inking up; hand printing; drying racks. Having these zones eliminates some of the mess and chaos that can quickly overcome a classroom. It also aids the teacher, keep the momentum of the lesson going, as pupils get involved in the process, as it is clearly shown to them.
Step 7
Lecturers reminded us to always evaluate a lesson at the end, especially at the end of a discipline, to cement pupils learning. It is also used to highlight successful and unsuccessful work, and can be used to start a class discussion about what they have leaned in the printmaking process.

Subscribe to:
Posts (Atom)